
OurBooks Quickstart Guide
Version: v1.1
Last updated: 2026-11-17
For: New users — your first hour with OurBooks.
Operating documentation for getting set up and keeping your books: company creation through first bills and invoices.
Welcome
Welcome to OurBooks, the accounting app for keeping your business's books. This guide walks you through getting set up and recording your first transactions — from creating your company through your first bills and invoices. Read it alongside the app, screen by screen; each chapter follows the same order you will actually click through. The whole guide takes about an hour end-to-end, but you can stop after any chapter and come back later — nothing here depends on doing it all in one sitting.
Table of contents
- Chapter 1 — Create your company
- Chapter 2 — Set up the basics
- Chapter 3 — Your first transactions
- Chapter 4 — Bank reconciliation
- Chapter 5 — Reading your reports
- Chapter 6 — Closing your first month
- Chapter 7 — Importing your existing data
- Appendix A — Where to find help
- Appendix B — Glossary
- Appendix C — Changelog
Chapter 1 — Create your company
You start by creating a company. A company in OurBooks is one set of books — one business's accounts, transactions, and reports, kept separate from every other company you own. If you run more than one business, each gets its own company. Right after you sign up, your dashboard shows Create Your First Company. Click Create Company and the Create a New Company modal opens.
Create your company
The modal asks for three required fields and one optional one. Fields marked with a red asterisk (*) are required.
- Company Name (required) — your business's name, for example
Acme Corp. You can change it later in Company Settings. - Industry (required) — the closest match from Freelancer, Service, Retail, Real Estate, or General. Your choice tailors a few defaults, such as your starting chart of accounts, to your kind of business.
- Entity Type (optional) — your legal structure: Sole Proprietorship, LLC, S-Corporation, C-Corporation, Partnership, or Non-Profit. Leave it blank if you are not sure; it does not block anything.
- Color Accent (required) — a color that tells this company apart at a glance when you have more than one. Pick any swatch.
Click Create Company. Setup takes a few moments — a countdown shows it working — and then your new company opens.
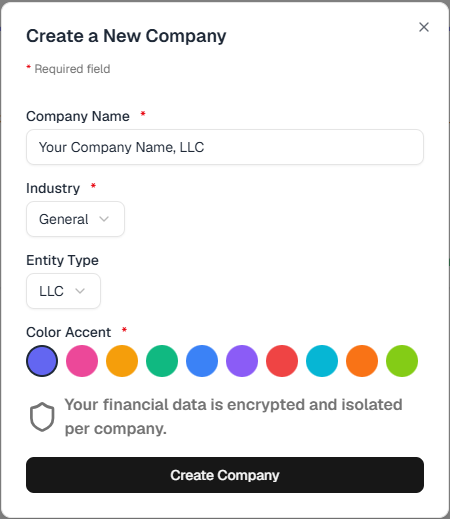
📌 Note — Your financial data is encrypted and isolated per company. One company's books are never visible from another.
⚠️ Warning — One setup choice is hard to change once you have recorded transactions: your fiscal year start. You confirm it in Chapter 2 — do not skip that step.
Choose how to get started
As soon as the company is created, a Welcome screen appears — Welcome to OurBooks, {your company name}! — How would you like to get started? — with four paths.
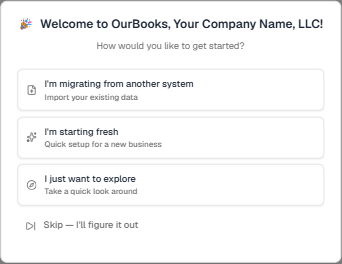
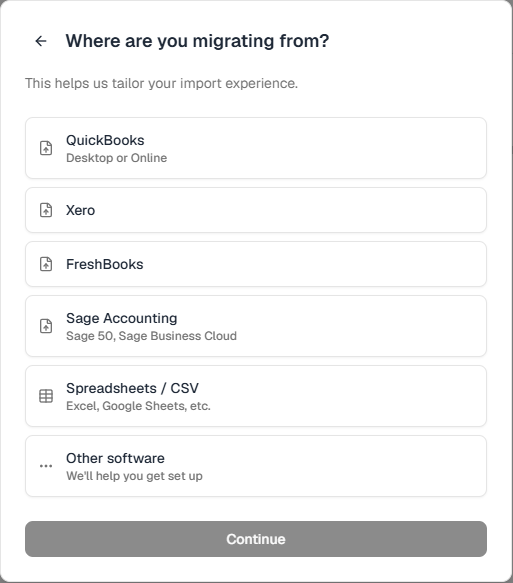
- I'm migrating from another system — Import your existing data. Choose this if you are moving from QuickBooks, Xero, FreshBooks, Sage Accounting, spreadsheets, or other software. It first asks Where are you migrating from?, then opens the import flow. See Chapter 7 — Importing your existing data.
- I'm starting fresh — Quick setup for a new business. This opens a short, four-step setup wizard for your currency, chart of accounts, default payment terms, and bank accounts. It is the path the rest of this guide follows — continue with Chapter 2 — Set up the basics.
- I just want to explore — Take a quick look around. Starts a guided tour with no setup dialogs; you can set things up later from the Hub.
- Skip — I'll figure it out — Closes the Welcome screen without setting anything up. Every setup step is still reachable from the Hub checklist.
💡 Tip — Not sure which to pick? Choose I'm starting fresh. It is the guided path this guide is built around, and nothing it sets up is permanent.
That is all of Chapter 1: you have a company, and you have chosen a path. The next chapter walks the starting fresh setup wizard step by step.
Last updated: 2026-11-17 · OurBooks Quickstart Guide v1.1
Chapter 2 — Set up the basics
This is the chapter where you do real setup work. It follows the I'm starting fresh path you chose in Chapter 1. If you picked a different path, you can still do everything here — each step is also reachable later from the Hub checklist.
When you choose I'm starting fresh, OurBooks opens a short, four-step wizard automatically. After the wizard, you confirm a few company settings and set up receivables, payables, your chart of accounts, and your first customers and suppliers.
The starting-fresh wizard
The wizard runs four steps in order: currency, chart of accounts, default payment terms, and bank account names. Each step opens the next when you confirm it.
Step 1 — Set your currency
The Set your currency dialog asks you to Choose the functional (home) currency for your company. This is used for all financial reporting. OurBooks pre-selects a currency based on your location (in the US, that is USD). Common choices — USD, EUR, GBP, CAD, AUD — are pinned at the top under Common; the full list is under All currencies, with a search box if you need it.
Pick your currency and click Confirm.
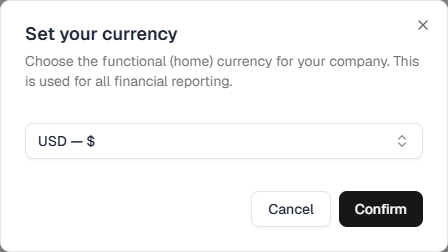
📌 Note — Your functional currency is your home currency for reporting. You can still record transactions in foreign currencies later; this setting just decides what everything is reported in.
Step 2 — Set up your chart of accounts
The Set up your Chart of Accounts dialog lets you Choose how you want to set up your accounts. You pick one of three ways: Generate with AI (describe your business and get a tailored chart), Create accounts automatically (a standard chart for your business type, selected by default), or I'll set them up myself (an empty chart you fill in yourself, by hand or by pasting from a spreadsheet).
Only Create accounts automatically asks one more question, the Account code digits — how many digits your account numbers use — and its button reads Create Accounts. The other two ways have no digits choice, and their button reads Continue.
- 4 digits (e.g.
1000,2000) — recommended - 5 digits (e.g.
10000,20000) - 6 digits (e.g.
100000,200000)
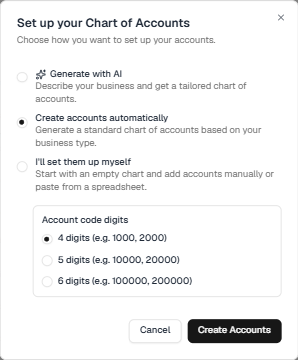
💡 Tip — Most small businesses use 4 digits. This sets the length of the codes in your starter chart. You can change it later in Settings; existing codes stay as they are. When in doubt, keep the recommended 4 digits.
Step 3 — Set your default payment terms
The Set your default payment terms dialog says We'll use these to work out the due date on new bills and invoices. You can always change them per document. It has two selectors: Bills you receive and Invoices you send. Pick the terms you want for each and click Save, or click Skip for now — you can set both later in Payables Setup and Receivables Setup, covered below.
Step 4 — Name your bank accounts
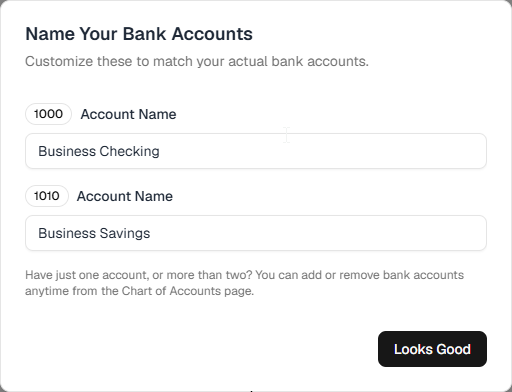
The Name Your Bank Accounts step starts you with two accounts — a checking and a savings account — and asks you to Customize these to match your actual bank accounts. Rename them to match what your bank calls them, then click Looks Good. If you chose I'll set them up myself in Step 2, your chart has no bank accounts yet, so this step is skipped.
💡 Tip — Have just one account, or more than two? You can add or remove bank accounts anytime from the Chart of Accounts page.
A second, optional dialog — Add Bank Details (Optional) — lets you enter account numbers so OurBooks can match imported bank statements automatically. You can fill these in or click Skip for now; this is not required to keep going.
Confirm your company settings
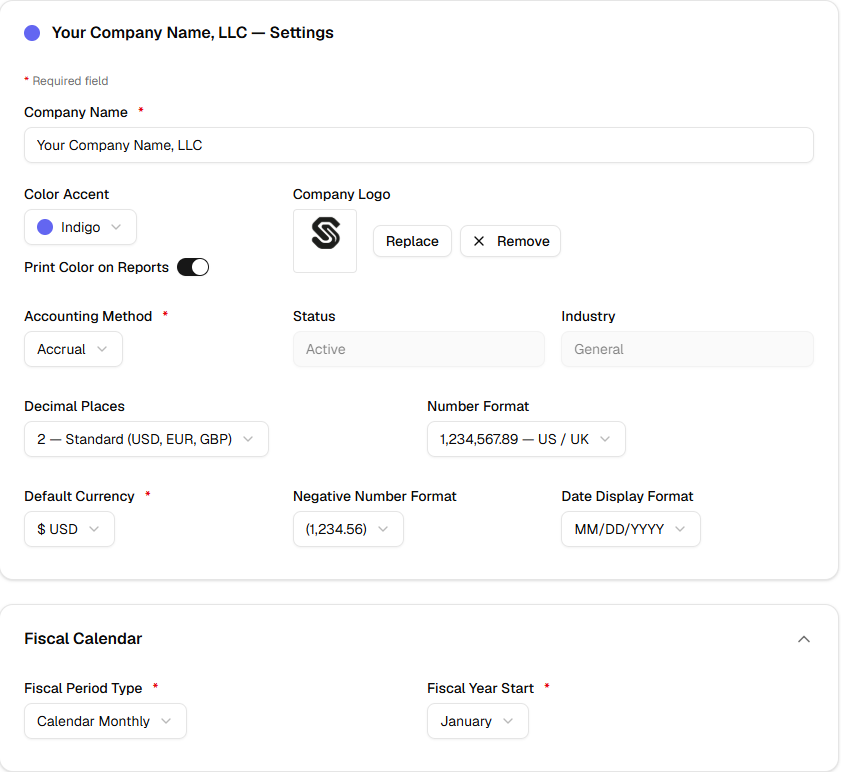
A few setup decisions live in Company Settings, not in the create-company modal. Open Company Settings from your company menu and confirm these:
- Accounting method — Accrual or Cash. New companies start on Accrual. Nothing asks you to confirm it and nothing blocks on it; change it here whenever you like, including after you have recorded transactions.
- Fiscal year start — The month your financial year begins. This is hard to change later, so set it correctly now.
- Company details — Your address and logo are recommended but not required. The setup checklist will not block you for leaving them blank; add them when convenient so they appear on your invoices and bills.
Set up receivables (AR)
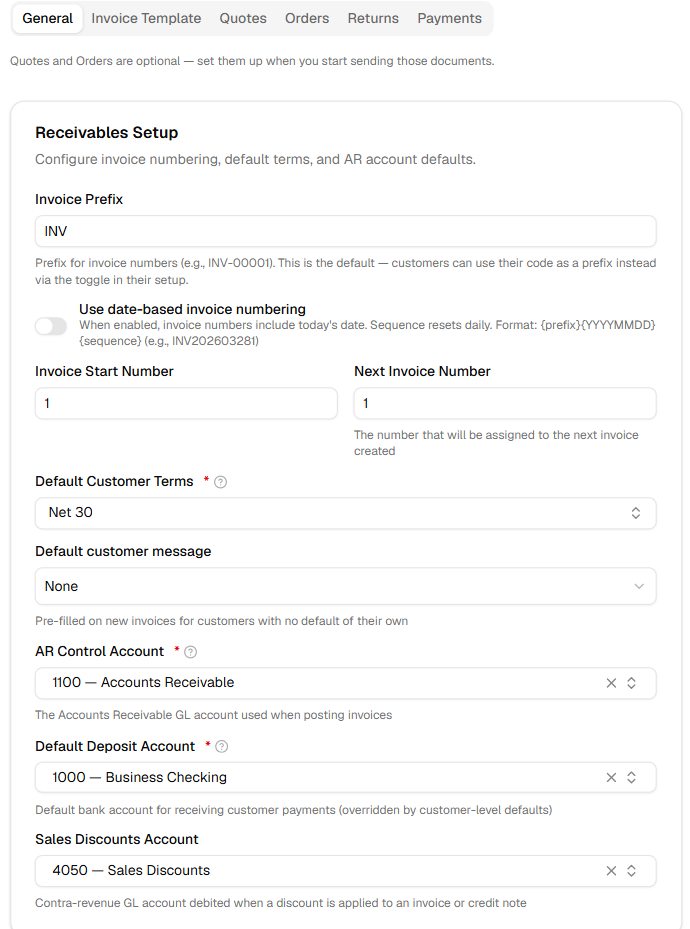
Open Receivables Setup from the Hub checklist. This controls how customer invoices behave. The page is split into six tabs — General, Invoice Template, Quotes, Orders, Returns and Payments — and it opens on General, which is the only one you need right now.
OurBooks fills in most of the required fields on General for you, and a note above the tabs offers Accept Defaults. Review the fields, then click Accept Defaults, or change them and click Save Changes:
- Default Customer Terms (required) — when invoices are due by default (for example,
Net 30). It holds the Invoices you send terms from the wizard. If you clicked Skip for now there, it is empty: pick one here. - AR Control Account (required) — the account that tracks money customers owe you. OurBooks pre-selects your Accounts Receivable control account; leave it unless you have a reason to change it.
- Default Deposit Account (required) — where customer payments land by default.
You can also set an Invoice Prefix and turn on Use date-based invoice numbering here.
Save Changes at the bottom of the page saves every tab at once, so you can edit on one tab and save from another — you do not need to save before switching. The Quotes, Orders and Returns tabs are optional and safe to skip until you start sending those documents.
The other two tabs are there when you want them:
- Invoice Template — how your invoices look (style, font, accent color, footer, custom fields), plus your Payment / Remit-To Instructions and whether invoices print your full bank account number. This card has its own Save invoice template button, separate from Save Changes.
- Payments — connect Stripe to accept online payments, and set up automatic payment reminders.
Set up payables (AP)
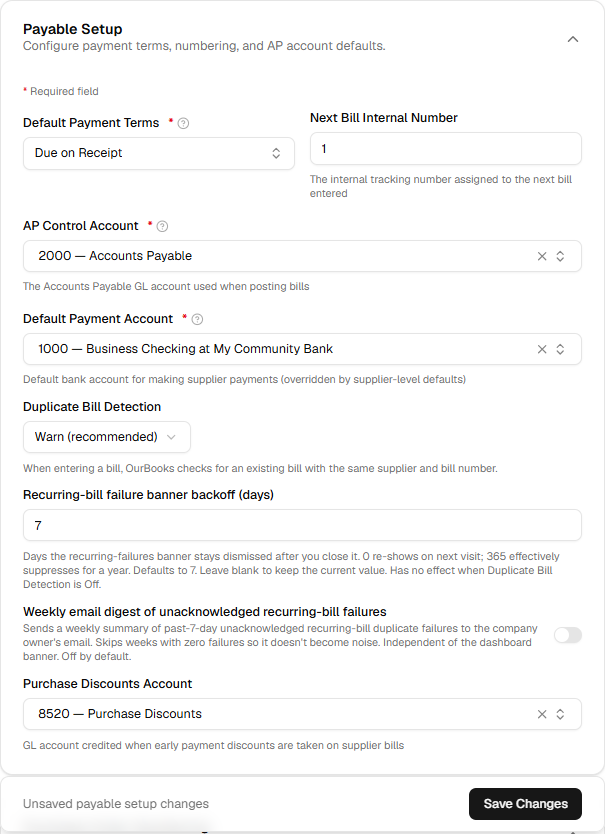
Open Payables Setup from the Hub checklist. This controls how supplier bills behave. Most required fields are filled in for you again, with the same Accept Defaults note — review them, then accept or Save Changes:
- Default Payment Terms (required) — when your bills are due by default (for example,
Net 30). It holds the Bills you receive terms from the wizard, and is empty if you skipped that step. - AP Control Account (required) — the account that tracks money you owe suppliers.
- Default Payment Account (required) — where bill payments come from by default.
This screen also has a Duplicate Bill Detection setting. When entering a bill, OurBooks checks for an existing bill with the same supplier and bill number. Choose the behavior:
- Off (no checking) — no duplicate check.
- Warn (recommended) — flags a likely duplicate but lets you continue.
- Hard stop (block save) — refuses to save a duplicate.
💡 Tip — Warn (recommended) is the right choice for most businesses: it catches accidental double-entry without ever getting in your way.
Your chart of accounts
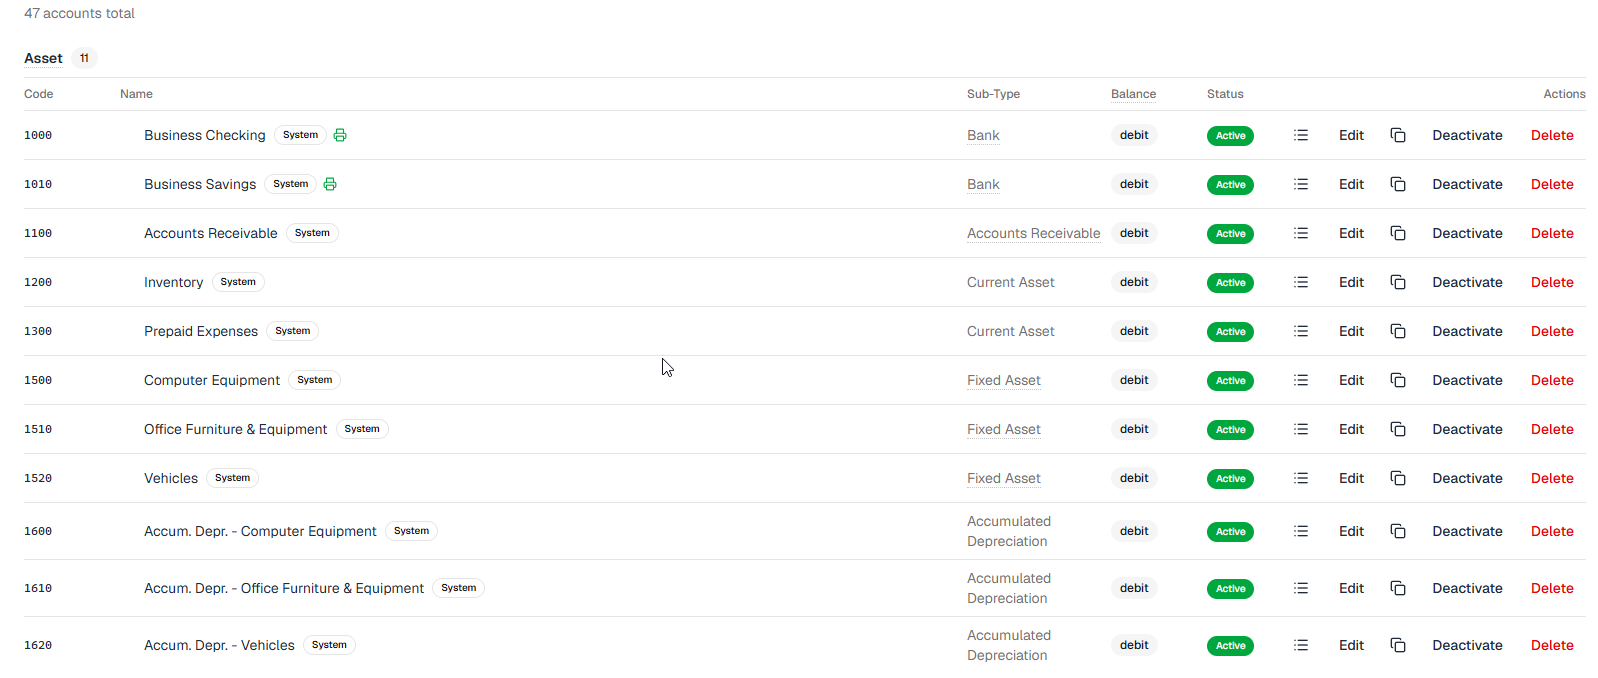
Your chart of accounts is the list of categories your money flows through — assets, liabilities, equity, income, and expenses. The starting-fresh wizard already created a starter set for your industry. To review or extend it, open the Chart of Accounts page.
You can use the starter accounts as-is, rename them, or add your own. Each account has a type (Asset, Liability, Equity, Income, or Expense) that determines how it behaves in your reports, and an optional sub-type for finer grouping. Add accounts only as you need them — you do not have to build the whole chart up front.
⚠️ Warning — Do not change an account's type after you have posted transactions to it; that can distort your reports. Adding new accounts is always safe.
Add customers and suppliers
You can add customers and suppliers now, or create them on the fly when you record your first transactions. To add one, open the Customers or Suppliers page and start a new record.
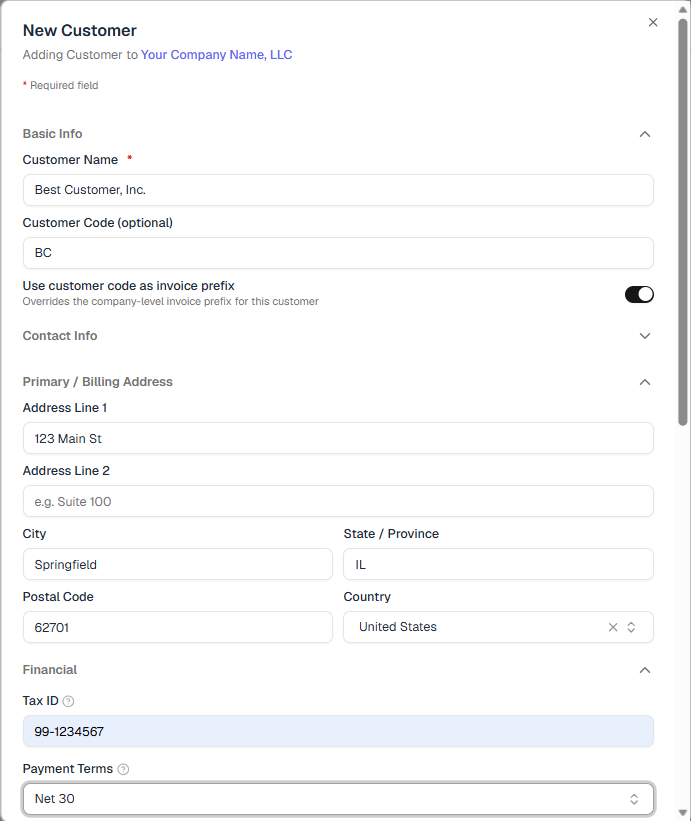
The only required field is the name — Customer Name or Supplier Name. Everything else is optional, so a minimum-viable customer is just a name. Two fields are worth knowing about:
- Account Number — a reference field. For a customer it is The customer's internal vendor or account number for your reference — printed on invoices. For a supplier it is Your account number with this supplier — printed on bills and payments.
- Use customer code as invoice prefix (customers only) — a toggle that Overrides the company-level invoice prefix for this customer. If you want a specific customer's invoices to carry their own prefix instead of your company default, turn this on. This feature is easy to miss and solves a common request.
📌 Note — A customer's Exemption Status defaults to Taxable. Change it to Tax Exempt or Partially Exempt only for customers who actually qualify. Suppliers have a 1099 Type field instead, which defaults to None.
When you create a record, the Always confirm before creating checkbox is on by default, so OurBooks shows a quick confirmation before saving. Click Create Customer or Create Supplier to finish.
With the basics in place, you are ready to record real transactions — the subject of the next chapter.
Last updated: 2026-11-17 · OurBooks Quickstart Guide v1.1
Chapter 3 — Your first transactions
Now you record real activity. OurBooks gives you two ways in: quick shortcuts for everyday income and expenses, and full forms for bills and invoices. This chapter covers both, plus a note on when to use the journal-entry screen directly.
Record an expense
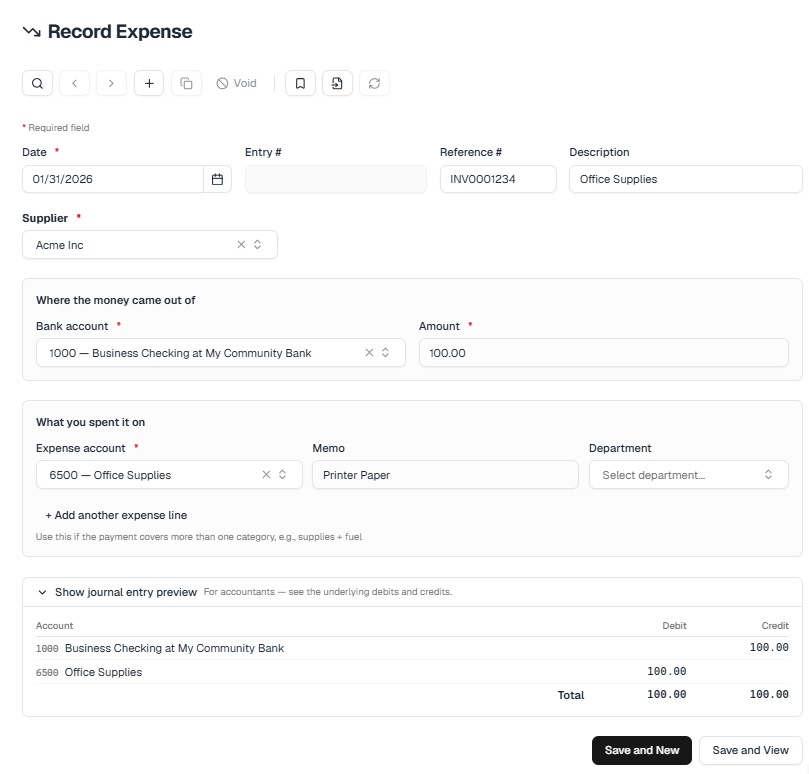
From the Quick Transactions shortcuts in the sidebar, choose Record Expense. The form has two sides: Where the money came out of (your bank or card account) and What you spent it on (the expense category). Pick the bank account, choose an Expense account, enter the amount, and — if you like — a supplier. If you choose a supplier and leave the description blank, OurBooks fills in something like Expense to {supplier} for you. Use + Add another expense line to split one payment across categories. Click Save and View to open the entry you just recorded, or Save and New to start the next one.
Record income
Record Income works the same way, mirrored. The two sides are Where the money landed (the bank account) and What you got paid for (the Income account). Choose a customer to tag the income to them; the description auto-fills as Income from {customer} if you leave it blank. Save the same way.
Create a bill
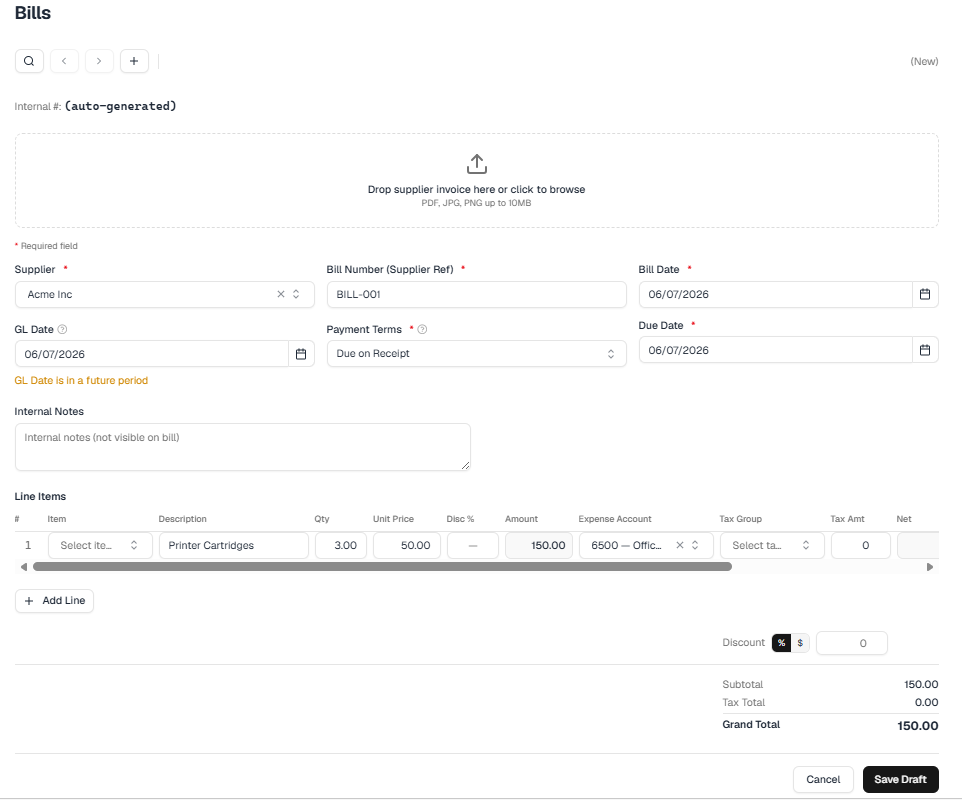
A bill records something you owe a supplier and tracks it in accounts payable. Open the Bill form and fill in:
- Supplier
- Bill Number (Supplier Ref) — the supplier's own invoice or reference number
- Bill Date and Due Date (or pick Payment Terms to set the due date for you)
- the line items and amounts
If you turned on duplicate detection in Chapter 2, OurBooks watches the bill number. When it spots a match it shows a Possible duplicate panel inline. On save, in warn mode, a dialog appears — This looks like a duplicate — A bill with this number already exists for this supplier. If you've checked it and this is intentional, you can save it anyway. Add a short reason and click Save it anyway, or go back and fix it. Otherwise click Save Draft. A draft is not in your books yet: click Post at the top of the bill to record it.
Receive goods before the bill arrives
Sometimes the goods turn up before the invoice does. If you raise purchase orders, OurBooks can record the delivery on its own and match the bill to it later.
The flow is purchase order → receipt → bill. Under Suppliers in the sidebar, Enter Purchase Order raises the order. Click Send on its row in the Purchase Orders list, then Confirm on the order itself; once you have sent and confirmed it, a Receive button appears on it. You can also start from Enter Purchase Receipt and pick the order there.
Either way you enter how many of each line actually arrived. A receipt records quantities only, no prices — the price is already agreed on the order. Each receipt line points at a specific order line, so one delivery can cover lines from more than one purchase order.
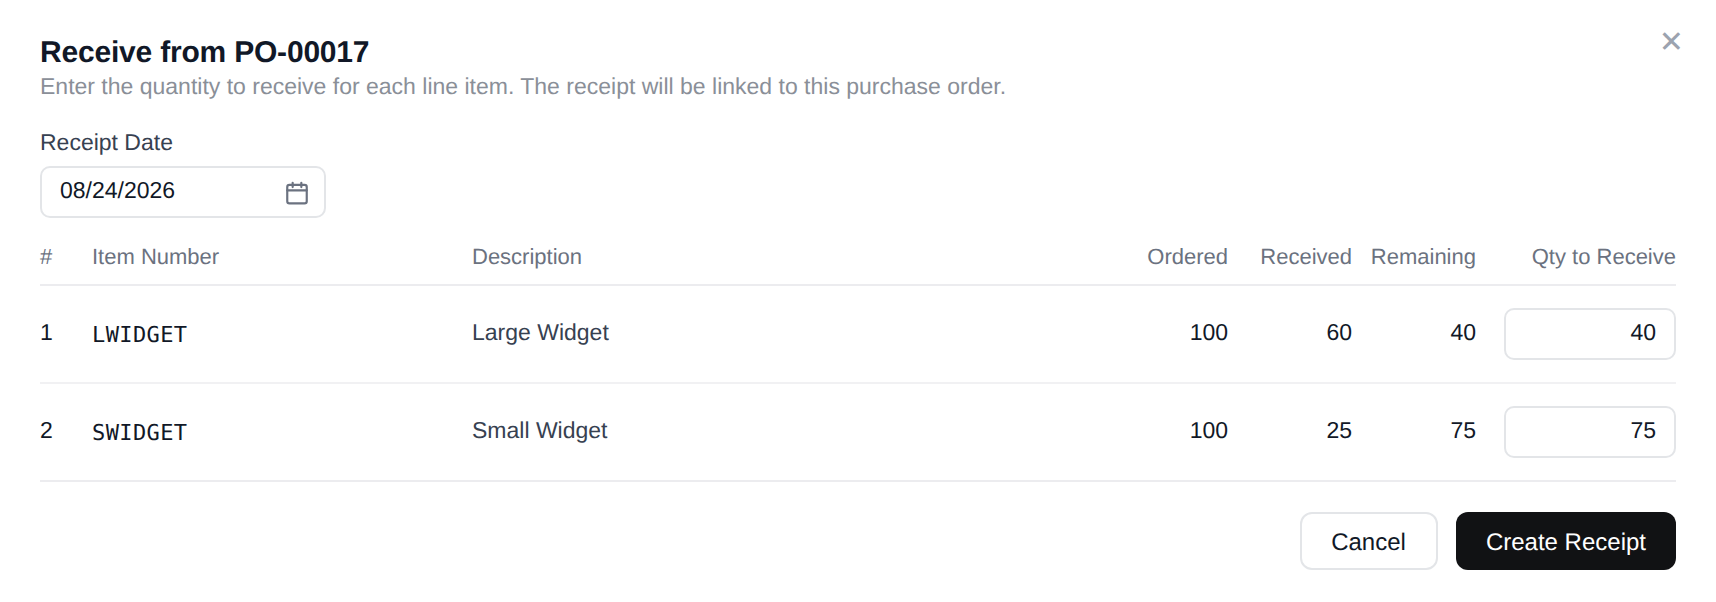
The purchase order then tracks all three legs — what you ordered, what arrived, and what you have been billed for — so a short delivery or a duplicate invoice shows up as a mismatch instead of a surprise.
If you do not raise purchase orders, you do not need any of this. Creating a bill directly, as above, is all it takes.
Create an invoice
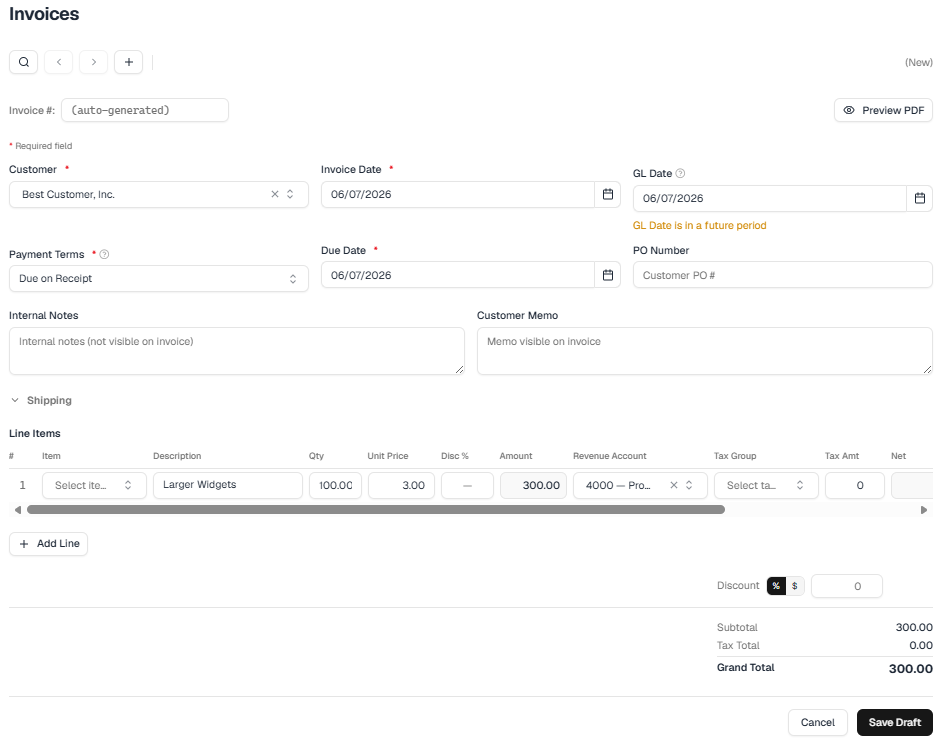
An invoice records something a customer owes you. Open the Invoice form, choose the customer, set the Invoice Date and Due Date, and add line items.
The invoice number fills in automatically from your receivables settings — including the date-based numbering option from Chapter 2. You can type your own number to override it; OurBooks marks an overridden number as custom and checks that it is unique. If it is not, you will see Invoice number already in use. Click Save Draft to save. A draft is not in your books yet: to record it, find it in the Invoices list and click Post on its row.
When to use the journal-entry screen
The shortcuts and forms above write the underlying journal entries for you. For anything they do not cover — an adjusting entry, an opening balance, a correction that spans several accounts — choose New Entry in the sidebar to open the full journal-entry screen, where you enter debits and credits directly across as many lines as you need. Most days you will not need it; think of it as the advanced tool behind the everyday shortcuts.
Last updated: 2026-11-17 · OurBooks Quickstart Guide v1.1
Chapter 4 — Bank reconciliation
At the end of each month your bank sends a statement. Reconciliation is how you confirm your books match the bank — every transaction accounted for and the ending balance agreeing to the penny.
First, bring the statement in: under Banking, open Import Statement, pick the bank account, and upload the file your bank gives you (CSV, OFX, QFX, QBO, or PDF) with the statement's dates and closing balance.
Start a reconciliation
Under Banking in the sidebar, open Reconcile. The Account Reconciliation page starts with a Select account… box — choose your bank account. A Start Reconciliation panel appears and asks how you want to reconcile: Match an imported bank statement (selected by default), or Tick items that have cleared (no statement) for an account with no electronic feed. It then asks for two things from your statement:
- Statement Date — the statement's ending date
- Closing Balance — the statement's ending balance
The date and balance come pre-filled from the statement you imported. An Opening Balance field is optional; for an ongoing account OurBooks fills it from your last reconciliation. Click Start Reconciliation.
The rest of this chapter follows Match an imported bank statement, which is selected for a bank account. Choose Tick items that have cleared for an account with no electronic feed, such as a loan, escrow, or credit card account: you tick each item that has cleared instead of matching it to a statement line.
📌 Note — Reconciling an account that already has history for the first time? OurBooks shows a First-Time Reconciliation Setup banner that helps you mark historical transactions as a clean opening point, so you only reconcile new activity from here on.
Match transactions
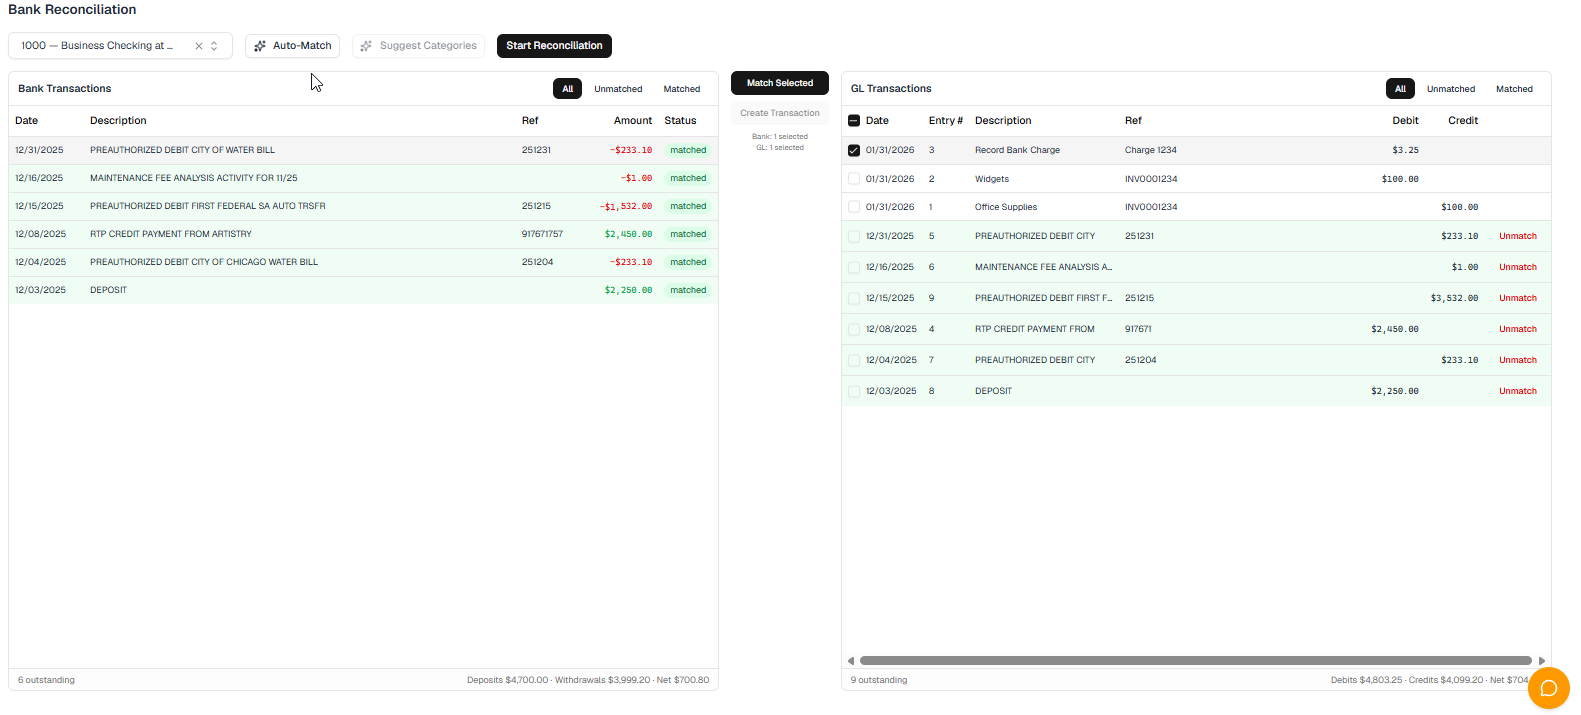
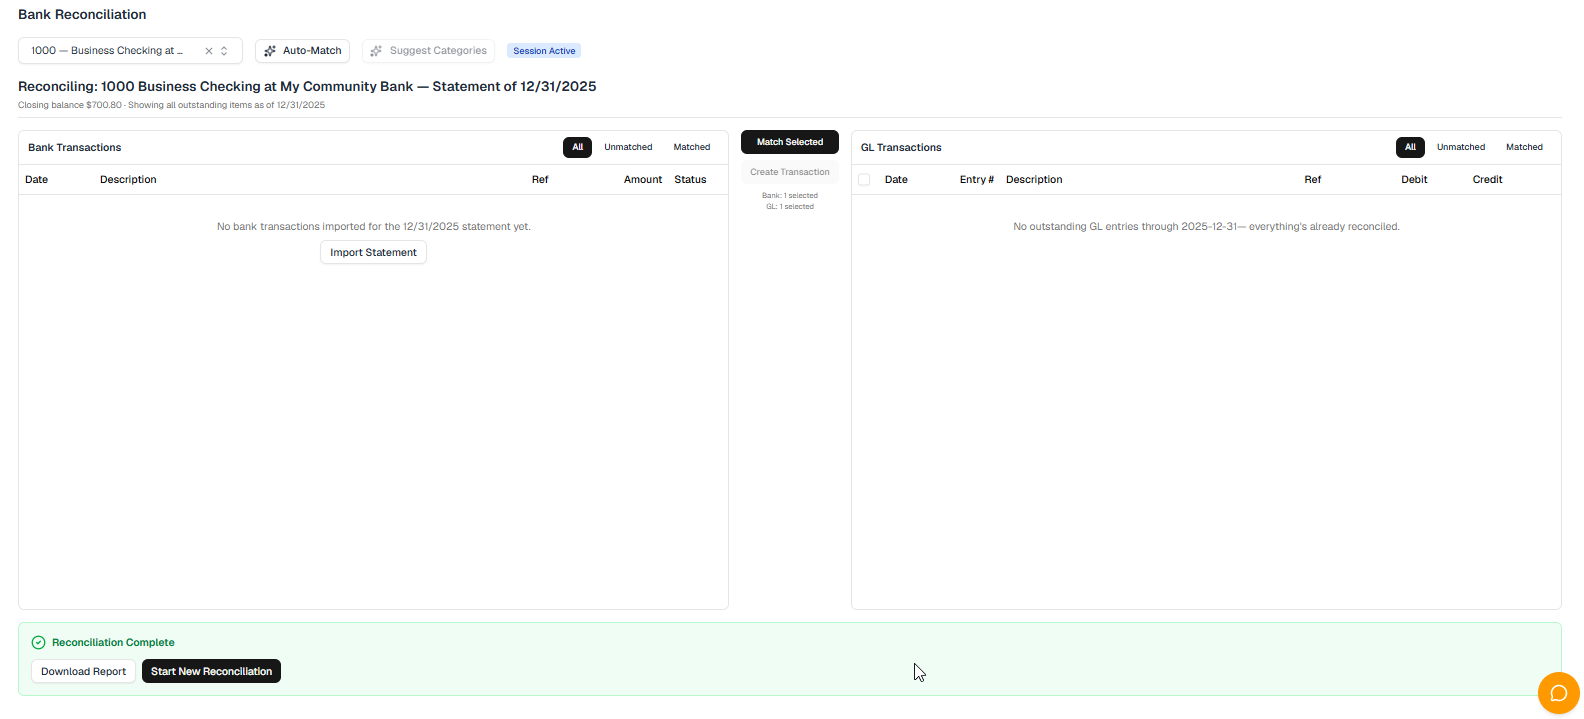
The workspace shows your bank transactions on one side and your book (GL) transactions on the other. Matching is the heart of the job:
- Select a bank transaction and the matching book transaction, then click Match Selected.
- Click Auto-Match to let OurBooks pair the obvious ones for you.
- If a bank transaction has no matching entry in your books — a bank fee, say — select it and click Create Transaction to record it.
Finish
The Reconciliation Summary does the math: your statement ending balance, plus deposits in transit, minus outstanding checks, set against your book balance. The Difference is the number that matters — when it reaches $0.00, you are reconciled. Click Finish Reconciliation.
⚠️ Warning — Completing a reconciliation cannot be undone. And once a transaction is reconciled, do not delete or edit it — that breaks the reconciliation it belongs to. If something is wrong, correct it through the reconciliation, not by deleting the transaction.
When you finish, you will see Reconciliation Complete and can Download Report for your records.
Last updated: 2026-11-17 · OurBooks Quickstart Guide v1.1
Chapter 5 — Reading your reports
OurBooks turns everything you have recorded into reports. Three of them give you the whole picture; the Inquiry pages let you dig into the detail behind any number.
The big three
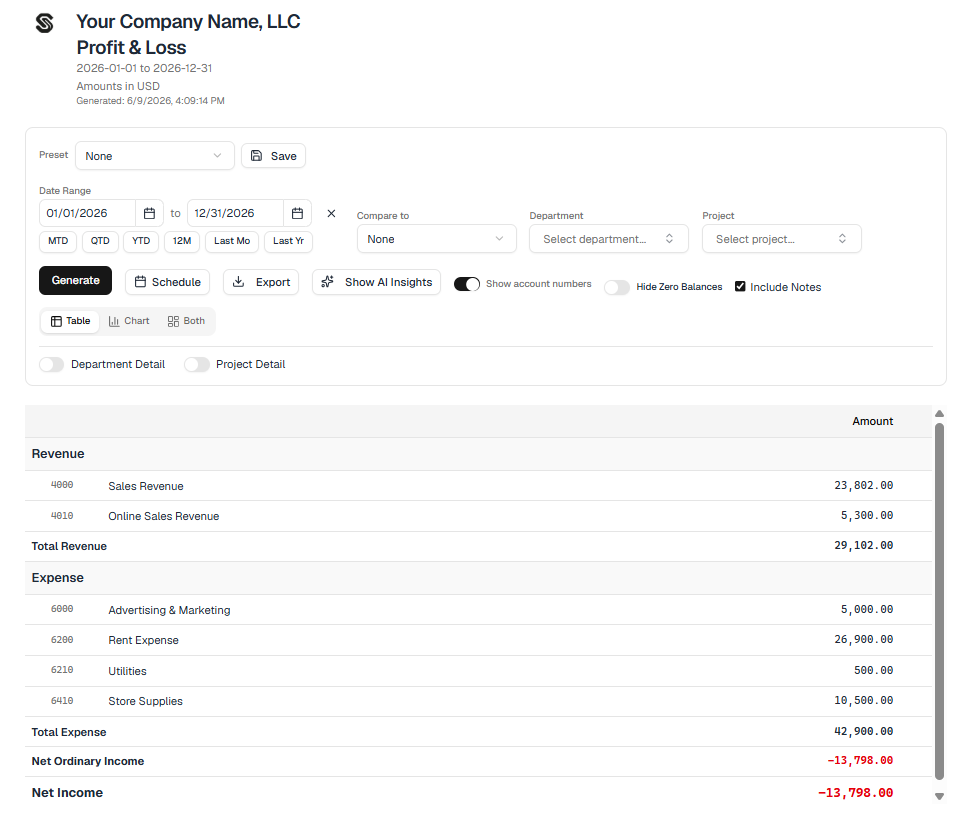
- Profit & Loss — what you earned and spent over a period. Choose a date range and click Generate. It answers "did I make money this month?"
- Balance Sheet — what your business owns and owes at a single moment. Set the As of Date and click Generate. It answers "what is my business worth right now?"
- Trial Balance — every account's balance in one list, debits and credits side by side. A quick snapshot you use to check the books hang together.
Filtering and dates
Reports that cover a span (like the P&L) use a date-range picker; point-in-time reports (Balance Sheet, Trial Balance) use a single As of Date. Quick buttons jump to the common ranges — MTD, QTD, YTD, 12M, Last Mo, and Last Yr. Reports are period-aware: the figures reflect the transactions dated within the range you choose.

The Inquiry pages
Reports are the formal, printable view. Inquiry pages are the interactive one — for drilling into the transactions behind a figure:
- Account Inquiry — every transaction in one account, with its opening, year-to-date, and cumulative balance.
- Customer Inquiry and Supplier Inquiry — every entry tagged to one customer or supplier.
Reach for a report when you want the statement; reach for an inquiry when you want to ask "what makes up this number?" In the Trial Balance Inquiry you can click any account to drop straight into its Account Inquiry.
Last updated: 2026-11-17 · OurBooks Quickstart Guide v1.1
Chapter 6 — Closing your first month
Closing a period locks it so the numbers you have already reported cannot change by accident. Most people close each month once it is reconciled and reviewed.
Close a period
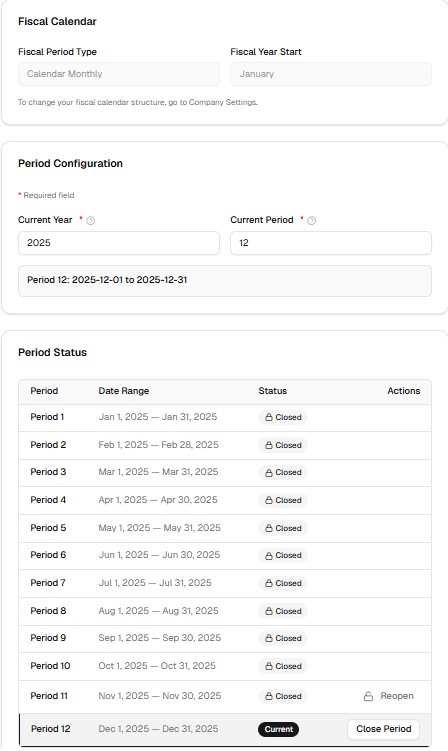
Go to General Ledger → Periods. The Period Status grid lists each period. Periods close in order, oldest first, so Close Period appears only on the earliest period that is still open. Click it, and OurBooks confirms — Close Period {n} of {year} (… to …). Journal entries to this period will require confirmation. — and you close it.
📌 Note — If your books start partway through the year, the months before you started are open periods too. Close them first, in order — they have nothing in them — and then close the month you are finishing.
What changes when a period is closed
Closing does not lock you out — it adds a guard rail. If you try to post something dated in a closed period, OurBooks stops to check. On the main posting screens (journal entries, invoices, bills, payments) a dialog appears — Period {n}/{year} is closed. Are you sure you want to post this … to a closed period? — with a Post anyway option if you genuinely need it.
📌 Note — Post anyway is meant for real corrections, not routine work. If you find yourself posting into a closed period often, the period probably should not be closed yet.
Reopening
Closed the wrong period, or need to make a larger change? On the same Period Status grid, click Reopen on the most recently closed period — This will allow posting to Period {n} of {year} again. Reopen it, make your change, then close it again when you are done.
Last updated: 2026-11-17 · OurBooks Quickstart Guide v1.1
Chapter 7 — Importing your existing data
If you are coming from QuickBooks — or Xero, FreshBooks, Sage, or spreadsheets — you can bring your data with you. Read this whole chapter before you start.
⚠️ Warning — Imports can't be undone. There is no undo for an import: you delete unwanted accounts one at a time on the Chart of Accounts (an account with transactions can only be deactivated), and customers and suppliers can only be deactivated, not deleted. Always review the staged data before you commit. Picture importing six years of history with one wrong setting, then unwinding it row by row — a few minutes spent checking the preview is worth it.
What you can import
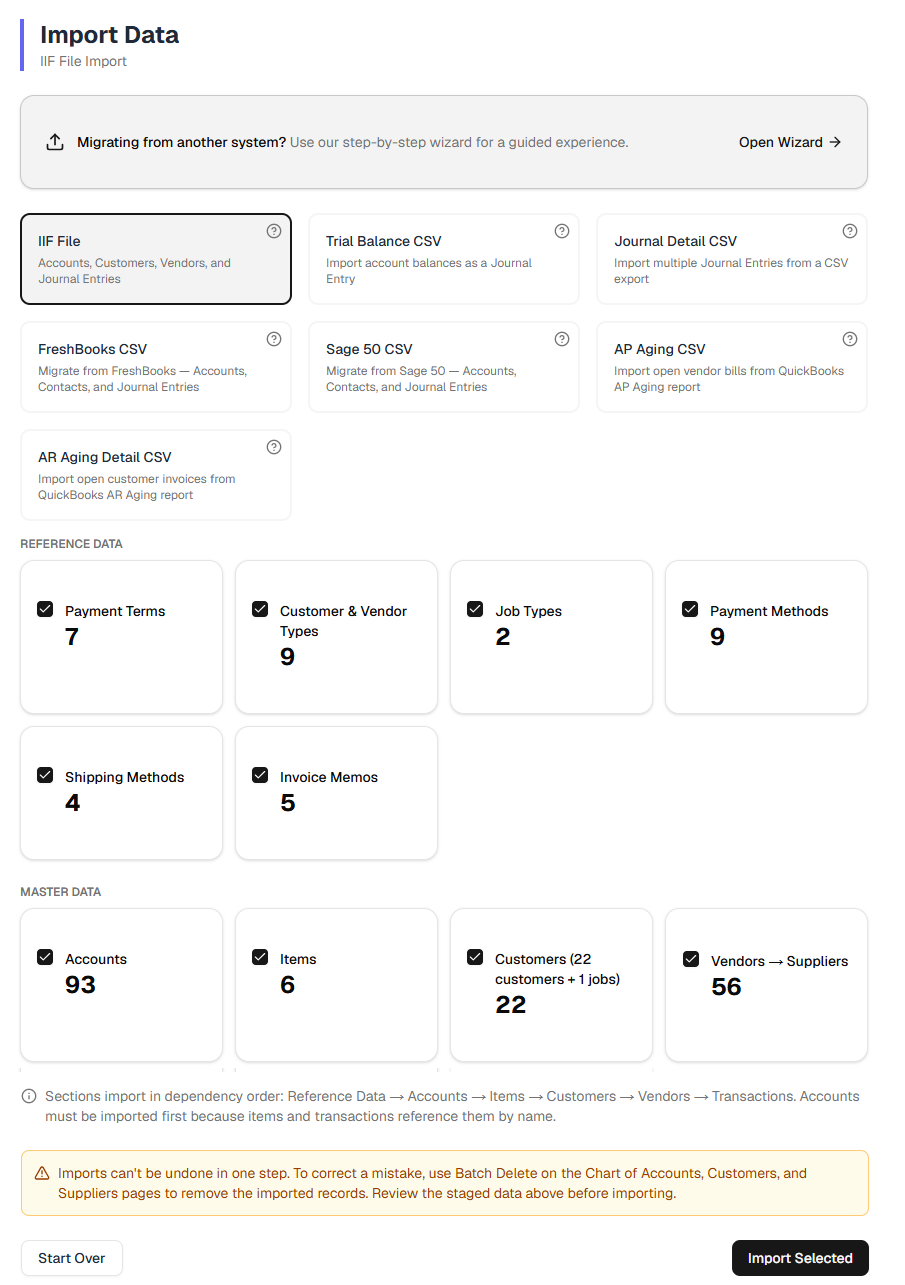
Open Import Data and choose a format:
- IIF File — Accounts, Customers, Vendors, and Journal Entries (the main QuickBooks Desktop export).
- Trial Balance CSV — Import account balances as a Journal Entry.
- Journal Detail CSV — Import multiple Journal Entries from a CSV export.
- FreshBooks CSV and Sage 50 CSV — migrate accounts, contacts, and journal entries from those systems.
- AP Aging CSV and AR Aging Detail CSV — open vendor bills and open customer invoices from QuickBooks aging reports.
- Items with Units of Measure, Inventory Valuation Summary and Opening stock list — bring in stock items and check your stock balance against a QuickBooks report.
💡 Tip — Migrating a whole system? Click Open Wizard for a guided, step-by-step experience instead of choosing formats yourself.
Exporting from QuickBooks
Each format has a ? help link with the exact export steps. For an IIF file from QuickBooks Desktop: File → Utilities → Export → Lists to IIF Files…, check the lists you want (Chart of Accounts, Customer List, Vendor List), and save the .IIF file. Journal entries come across separately, via the Journal Detail CSV.
For the full export list, the import order and what does not come into OurBooks, see Moving from QuickBooks Desktop to OurBooks.
Importing safely
Upload or paste your file. OurBooks shows a Master Data Preview — counts of the accounts, customers, and vendors it found, each as a checkbox you can include or exclude. Check those numbers against what you expected. The amber note above the buttons repeats the no-undo caution. When the preview looks right, click Import Selected; to back out, click Start Over.
For bank or card transaction imports, OurBooks walks you through a Preview → Review → Commit flow where you categorize each transaction before anything is saved. Transactions you categorize yourself come in as draft journal entries; post them once you have checked them.
Last updated: 2026-11-17 · OurBooks Quickstart Guide v1.1
Appendix A — Where to find help
- In-app help — the Help menu inside OurBooks links to guidance and to this guide.
- Email — you have a direct line to the OurBooks team. Reach us anytime at support@ourbooks.app — questions, bug reports, and feedback all welcome.
Last updated: 2026-11-17 · OurBooks Quickstart Guide v1.1
Appendix B — Glossary
Plain-language definitions of the terms used in this guide.
- Accounting method — whether you count income and expenses when cash changes hands (cash basis) or when invoices and bills are issued (accrual basis).
- Accounts payable (AP) — money you owe your suppliers.
- Accounts receivable (AR) — money your customers owe you.
- Accrual basis — recording income when you invoice and expenses when you are billed, regardless of when cash moves.
- Balance sheet — a snapshot of what your business owns (assets), owes (liabilities), and is worth (equity) at a point in time.
- Cash basis — recording income and expenses only when money actually moves.
- Chart of accounts — the full list of categories, called accounts, that your money flows through.
- Control account — a summary account, such as AR or AP, that ties to the detailed subledger of customers or suppliers behind it.
- Double-entry — the system where every transaction affects at least two accounts, with equal debits and credits, so the books always balance.
- Fiscal year — your business's accounting year; it does not have to start in January.
- Journal entry — the underlying record of a transaction as debits and credits.
- Period — a span of time, usually a month, that you report on and then close.
- Profit & Loss (P&L) — income minus expenses over a period; also called the income statement.
- Reconciliation — matching your books to your bank statement so the two agree.
- Trial balance — a list of every account's balance, used to confirm the books balance.
Last updated: 2026-06-09 · OurBooks Quickstart Guide v1.1
Appendix C — Changelog
- v0.1-DRAFT (2026-06-09) — Initial draft of Chapters 1–7 and Appendices A–C. Awaiting review and screenshots.
- v0.1-DRAFT (2026-08-24) — Chapter 3: added Receive goods before the bill arrives, pointing at the purchase order → receipt → bill path.
- v0.1-DRAFT (2026-09-13) — Chapters 1–2: the setup wizard drops the income-timing step and now runs three steps (currency, chart of accounts, bank account names). Cash or accrual is a company setting rather than a setup question.
- v0.1-DRAFT (2026-10-16) — Chapter 2: account code digits are no longer permanent; the warning becomes a tip that you can change the length later in Settings and existing codes stay as they are.
- v0.1-DRAFT (2026-10-20) — Chapter 6: periods are found under General Ledger → Periods (previously GL Setup → Periods).
- v1.0 (2026-11-15) — Released after a check of every chapter's screens and labels against the app (nothing posted). Chapter 1: the new-company modal opens from Create Company on your dashboard rather than on its own. Chapter 2: the setup wizard gains a default payment terms step (now four steps), the chart of accounts dialog offers three ways to start, and Receivables Setup has a Returns tab. Chapter 4: reconciliation starts from Banking → Reconcile. Chapter 7: lists the stock import options.
- v1.1 (2026-11-17) — Checked end to end on a new company on 2026-11-17, with transactions posted, a reconciliation completed, a period closed and reopened, and an import committed. Chapter 1: fixed (the wizard has four steps). Chapter 2: fixed (only automatic chart setup asks for code digits; skipped payment terms leave the setup fields empty; new Receivables Setup screenshot). Chapter 3: fixed (Save and View / Save and New; posting a bill and an invoice; sending and confirming a purchase order). Chapter 4: fixed (import the statement first; the two ways to reconcile; finishing does not ask to confirm). Chapter 5: fixed (Account Inquiry balances). Chapter 6: fixed (periods close in order). Chapter 7: fixed (what replaces undo; categorized bank lines arrive as drafts). Appendix A: drops the beta and video wording.
Last updated: 2026-11-17 · OurBooks Quickstart Guide v1.1
Next steps
No credit card required